|
|
Post by DeadlyPeace on Jan 15, 2008 13:47:33 GMT -5
wow man i just took a look at this beast for the first time..it is def. a jaw dropper for sure..and i thought that it was awesome that is still has the 22r in it  Those rear shackles are sexy  For the lights, and I dont know if this would work, but you could buy some aftermarkets and stick em off the top like crab eyes. I dont know if it would limit visibilty etc. |
|
|
|
Post by BuckUrspace on Jan 17, 2008 9:01:54 GMT -5
I dig it!
|
|
|
|
Post by stice316 on Feb 4, 2008 5:58:10 GMT -5
it is a cool ride
|
|
|
|
Post by josejuan1012 on Feb 4, 2008 23:29:02 GMT -5
deadlypeace i have two ideas i can pitch in.... on is you can swith your head lights for the new tundra lights and take them out then fill in the holes wiht sheet metal.... and the other is you leave ass is and just cover the holle front with some kind of after market grill??? because i think it looks mad lke the tubes are its eye browns and its making a face at you... just an opinion your choise.... >>>crazy as phucker know as peach  |
|
|
|
Post by DeadlyPeace on Feb 5, 2008 12:13:48 GMT -5
Thanks for the comps guys.
Jose, Thanks for the suggestions. Not sure on what you're saying about the new Tundra head lights. Could you explain a little better? Thanks.
As far as the grille goes I'm not planing on sheeting the tubing. I'm planning on making the grille in the stock location area. If you're looking at the pic of the side view, my thought was to bring the grille down from under the end of the hood down to the back of the bumper. It would go all the way along the whole front and blend into the sides. Then I would bring the headlights forward an 1"-2" to the new grille. Still not set on a complete design of it yet.
|
|
|
|
Post by josejuan1012 on Feb 5, 2008 23:41:31 GMT -5
the reason why i told you that the tundra headlights would work is beacuse they have more of an eye shaped but you dont want to sheet all around the tubbing so then it wouldent work??... (15 mint. later) i made a quick sketch not the best but ittl help me explain  you see what i mean and even i think that if you take them out and lower them a bit i think about 1''-maybe 2"s to the bumper it would look good? plus you can go to a toyota salvage place and get them for cheap?? just an idea its up you
>>>crazy as phucker know as peach  |
|
|
|
Post by DeadlyPeace on Feb 6, 2008 2:04:18 GMT -5
 Hey your pic's a little sideways ;D LOL Hey your pic's a little sideways ;D LOL
I gotcha now. It's still an idea I'll send through my brainwaves when I get around to finally doing the grille. I've ran a few different ideas through my head, plus a couple thoughts from other people. The final will more then likely a mix of a few of them together. Thanks for the idea. We'll see what happens when it comes to mocking things up. |
|
|
|
Post by stice316 on May 10, 2008 10:09:33 GMT -5
looking good. What if anythng have you done with the alternator. I'm wanting to move mine and use a gm 100amp.
|
|
dc
New Member

Posts: 3
|
Post by dc on Dec 17, 2008 23:56:08 GMT -5
hey man like the ride......when you do the custom flatbed on that thing is it possible for you post pics?
Ive got a 95 Tacoma daily driver im wanting to build a flatbed for but dont want the workish
type flatbed you see on duallies n whatnot.......i like the offroaders flatbed myself
and think i can make it workout where its just as useful to me as the 1 ton flatbeds
|
|
|
|
Post by DeadlyPeace on Dec 21, 2008 3:49:57 GMT -5
Yeah! Anytime I do some major work on it I be posting it. Just not sure on when I'll get a chance to do it. Been away for a while (about 6 months) rest up from having back surgery, and money's getting tight from not being able to work.
|
|
|
|
Post by DeadlyPeace on Jan 30, 2009 5:03:48 GMT -5
|
|
|
|
Post by Hoodlum on Jan 30, 2009 9:01:12 GMT -5
It's good to know that your up and going again bro.Glad to see some progress on TOYZILLA.  |
|
|
|
Post by DeadlyPeace on Feb 3, 2009 5:25:18 GMT -5
Thanks.
Still have to wait before I can do anything major. It sucks, but soon, I hope.
I had to go do something on Zilla, I was starting to get bored 
|
|
|
|
Post by DeadlyPeace on Feb 12, 2009 16:36:36 GMT -5
Been doing a little bit more here and there as I can. I started off working on some of the wiring. While I was at the auto parts store getting some oil and a filter I found an actual headlight switch that is a 3-way. They didn’t have one when I first built the dash so instead I grab a small standard 2-way push-pull switch as a temp. So now I can use it for turning on my running/parking and headlights. The only bad part about the headlight switch is that the knob about 3 times bigger. I liked the smaller knob better and unfortunately the push/pull rod were different diameter so I couldn’t just simply swap them. So I’ll have to make one or see what I can find to use/modify as one.
I also removed the extra connector to the horn. This shorting the amount of wire in the column cover and making it so I can just disconnect it from the horn assembly itself.
While I had the dash off I decided to wire up my old e-fan that I replaced on Blue. The only problem it had (at the time) was the control panel went out on it so I had to bypass it so it could only be turned on and off with a switch and not the temp sensor. I could have just got a new control panel, but I decided to just replace it cuz I wanted one for Zilla anyways and the switch only would be fine for this. Unfortunately after getting it wired up, it didn’t work. For some reason the motor decided to stop working while it was in storage. Maybe it got pissed cuz I replaced it while it was still working, I don’t know.
Well I did happen to have another fan lying around from a Hyundai that worked. Not sure of the CFM’s for it, but checking it out it seems to work good so I made some temp funky mounts for it. It does sit on the right side of the radiator cuz it got a long motor on it and putting it in the center the motor would be going through the pulleys and almost hitting the block.
The next item I worked was to mock something to hold the steering column from being pulled out. My original though was to weld two tabs to the side of the bearing case so that they would be under the tabs from the column cover. Not working on Zilla for awhile I forgot about this and made the tabs on the column cover flush to the end, instead of inside .120” for clearance for the bearing case tabs. I thought about cutting the tabs out and moving them where they should have been, but instead decided to just make a full plate that went under the column cover.
For this I predrilled holes for self-tapping screws in a sheet of metal where the mounting screw and bolt would go from the column cover. Then screwed the cover to the sheet of metal and cut out a rough shape of the plate.
I then grinded it down to the actual shape while it was still screwed to the cover. I then removed it from the cover and measured and drilled the holes for the bearing case and the horn wire and made notches for the two upper dash mount bolts.
For mounting the plate to the bearing case (still no aluminum welding wiring) I cut out a strap to wrap around the bearing case. I made the seam where I had to notch it for the stop rod so that it would be less to weld. I then positioned the plate where it needed to be and welded it on. I then put two self-tapping screws through the side. The screws did have to be cut down to clear the column. Here's finished pics of it.

Although this seem to hold really well, when I go to redo do it I’ll make the plate thicker, probably .120, and weld it right to the bearing case and weld up the two screw holes.
These days a lot of SUV’s seem to be judged more by the number of cup holders they have……. So I added a couple.

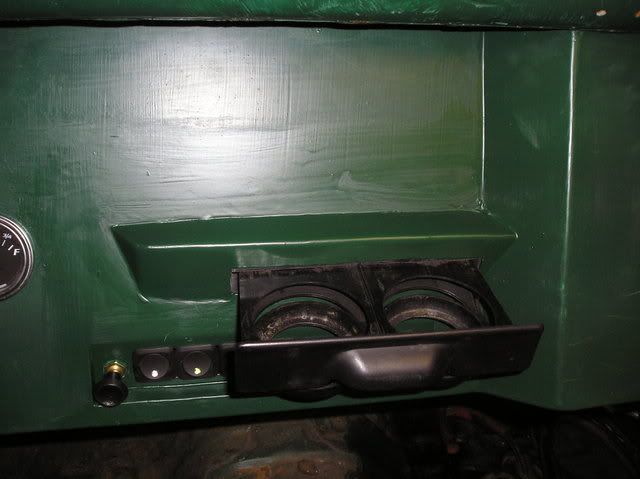
I also made a little area on the left side for 1-2 future switches, lights or whatever. Maybe even a passenger eject button.
Right now I’m in the middle of doing the panels for the front area of the doorway. I just finish the passenger side last night. Just needs a little paint. I’ll probably do the driver side Friday or this weekend.
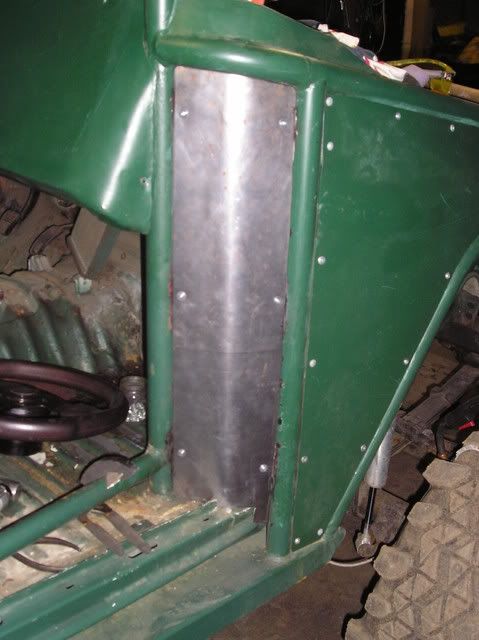
|
|
|
|
Post by DeadlyPeace on Feb 16, 2009 3:35:14 GMT -5
Well I finished the other doorway panel today and just thought I’d throw out a little tip for bending sheet metal into a curve when you don’t have access to all those cool and expensive machines.
 What you’ll need to do this is: What you’ll need to do this is:
1. A couple 4x’s as close to or longer then the piece of sheet metal.
2. Plywood or a couple 1x’s to screw to the 4x’s.
3. A piece of pipe as close to the same diameter as the curve you want and as close to or longer then the piece of sheet metal
4. And a BFH

After getting it to the point when you’re ready to bend it take a couple 4x’s and screw them to a piece of plywood about an 1” closer then the width of the sheet metal. This distance could very a little depending on the width and the amount of a curve you want the sheet metal to be. The wider or more curve you want the closer in you want the 4x’s to be.
Lay the sheet metal across it so you have a 1/2" on each 4x, lay the pipe on top of the sheet metal and somewhat gently hit it with the BFH. Make sure to go back and from end to end and roll the pipe to the sides also.

The end result is a nice smooth curve.
 I also tore the motor apart on my older Flex-a-lite e-fan and got it working again. Seem to just need a little cleaning so now I can reinstall it and get rig of that Hyundai one. I also tore the motor apart on my older Flex-a-lite e-fan and got it working again. Seem to just need a little cleaning so now I can reinstall it and get rig of that Hyundai one.
|
|
|
|
Post by Hoodlum on Feb 16, 2009 10:38:05 GMT -5
Glad to see I'm not the only one that puts a framing hammer handle on a 10lb sledge head ;D
|
|
|
|
Post by DeadlyPeace on Jun 3, 2009 2:59:24 GMT -5
Well decide to do some modifications to the suspension. Had some Jonny Joints that I was going to put on someone else’s rig a while back, but then they decided that they didn’t want them so I got stuck with them. So I figured I'd try them out on Zilla. Along with this I thought I’d give the front end a little lift. The rake from the back to the front was about .56” for every 12”. It was a bit much for my taste so I wanted to cut it at least in half. My shackles were also at a 33* angle and they should be about 15*-20*.
Here’s what the old spring mount looked like.

To start with I cut the braces and the lower half of the mounts off for replacing.

For the upper half of the mounts I just removed the part that was on the inside of the body mount support. I also cut and clean up half of the stock shock mount tube that goes through the frame. This will be the area that the new mount will go.

The top bolt to the shackle was at 6 3/8” from the top of the body mount support. So I cut a piece of 1/4" x 2” sq tube to 6 1/2". Then cut and grinded the end for the Jonny Joints to sit, and grinded the side of the tubes where they will sit against the weld from the stock shock mount tube. I also cut a piece of 1/16” sheet metal to fit inside of the other end and fully welded them in place so that no water could get inside the tube.
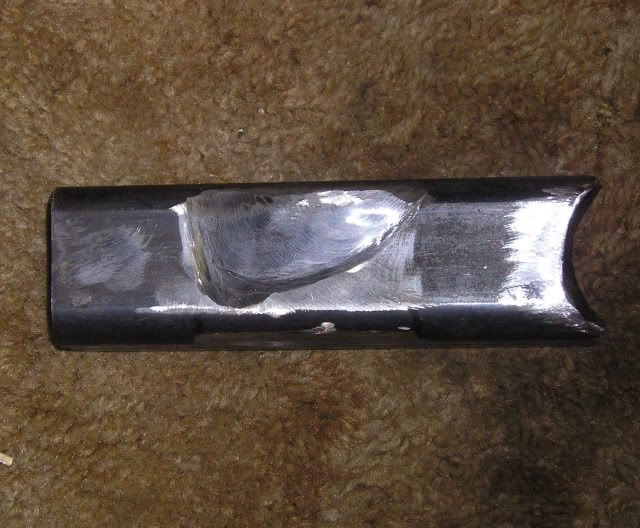
The tube for the Jonny Joints were then welded to the end of each of the sq tubes and then the whole new mount welded into place. Then I shortened and/or reshaped the old braces as needed to fit in there new locations.
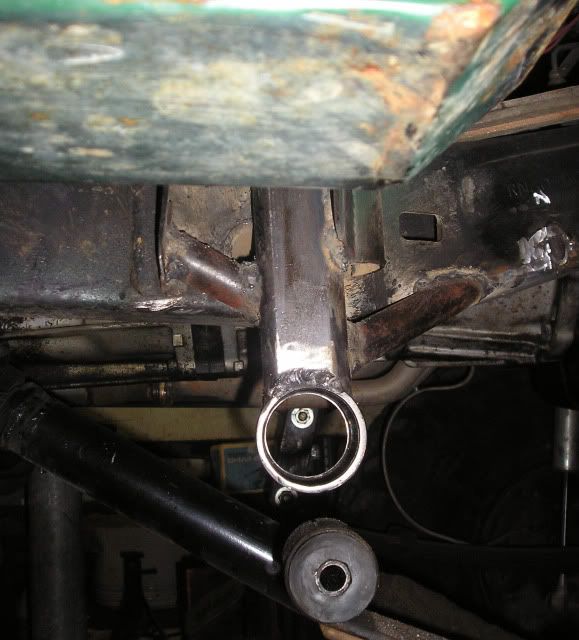
Then they got cleaned primed and the left side painted. I forgot to finish the remains of the old mount on the right side so it just got primed for now. If you look at the pics below (left side) you can see I cut, smashed and welded the bottom of the tube into the body mount support, whereas the on the pic above (right side) I didn’t.
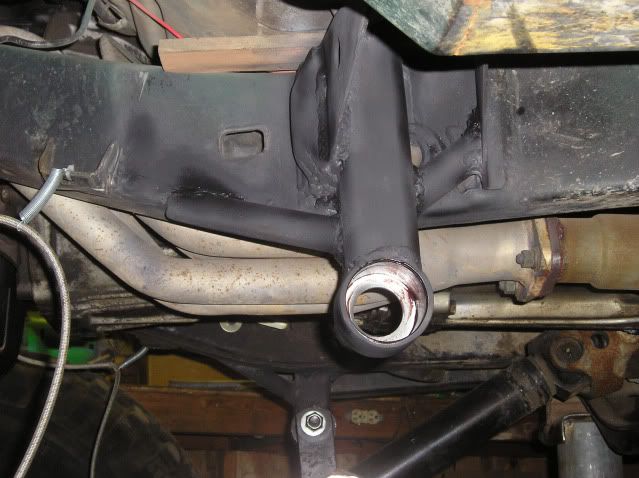

Welding tip:
When welding to things that have wires, fuel lines, etc on them that can't be easily removed, disconnect them if needed and use a piece of wood (soaked in water if real close to welding area to keep it from lighting up) or other form of protection to hold them away from the heat.
Painting tip:
What I like to do is keep a can of old used grease so when painting parts that have a machined surface or something that I don’t want any over spray on I just put a light coat of the grease on that area and paint away. When done, just wipe the grease off.As you can see there’s no room for the snapring to hold the Jonny Joint together.
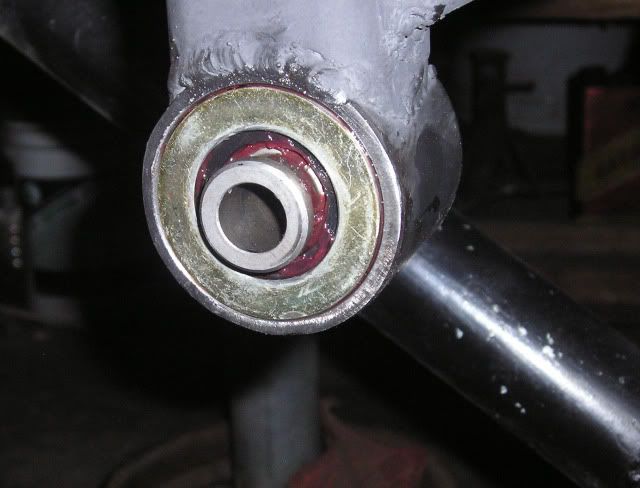
So what I did was used a long fully threaded rod with a large socket on each side to compress the parts together while I got the snapring in.
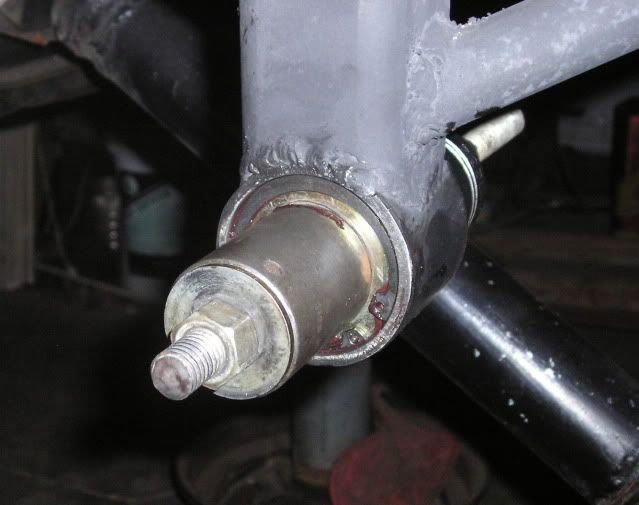
Here’s a (almost) finished look

The end results came out to a rake of .28” to every 12” (was hoping for a little less but much better). The upper shackle bolt now at 7 3/4” from the top of the body mount support. And the shackles at a 15* angle (was expecting about 18*, but like 15* better).
Now I just have to make a date with the Con and see how they do. I did do some flex test with my trusty RTI Ramp (aka tractor) just to check it out. The front flexed about the same. Might have got an inch out of it, but not sure. My front springs don’t twist as bad as they did though. I did get some more flex in the rear.

|
|
|
|
Post by DeadlyPeace on Jun 17, 2009 1:45:17 GMT -5
Ok since the new suspension mod with the Jonny Joints I noticed that my dual shackles decided they like to over extend and fold back the wrong way. Had this problem on my DD/Wheeler once or twice, but not enough to worry too much about it, but did think of different ideas to fix it. Zilla seems to do it quite a bit from doing the flex tests at home so I decided before I hit the trail again I’d stop it ahead of time.
What I did was removed the shackle assembly and got a nylon strap that I just happen to have laying around. Decided on an approximant length I wanted and sewed it so it had a loop at both ends.
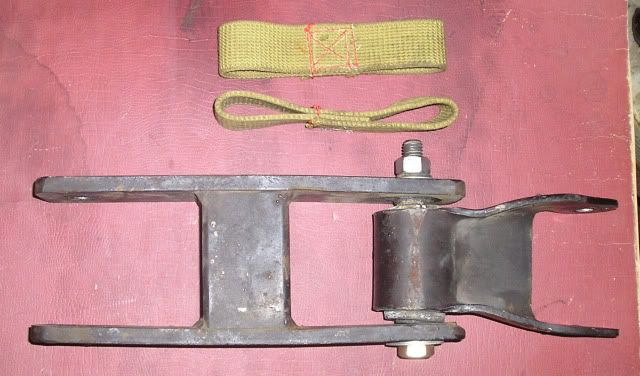
I then took a 3/8” steel rod and cut two pieces to the width of where it would go through the Chevy shackle and bent the ends of one of them to form somewhat of a u shape with a flat bottom.

I then drilled a hole through the side of the Chevy shackle where I was going to insert and weld the straight rod, but then thought about separating the shackles and decide on a bolt instead. The bent rod I welded to the lower shackle at the point just before the strap held the shackles were fully straight.

Side view.
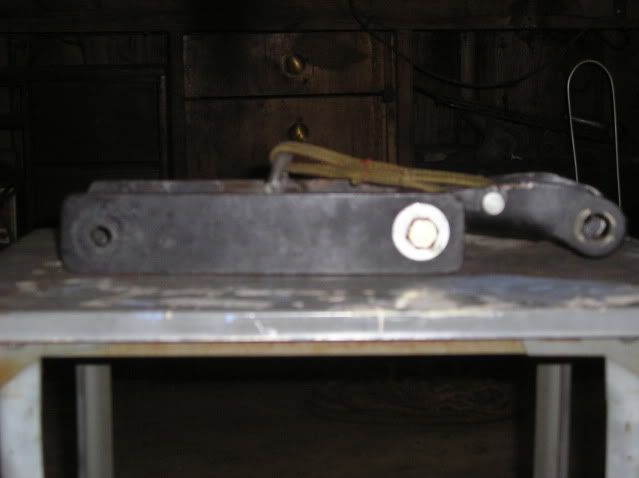
Installed and at rest.

Still have to do the other side to do tomorrow night and then test them out maybe this weekend.
|
|
|
|
Post by Hoodlum on Jun 17, 2009 15:11:19 GMT -5
I knew I should have not skipped that home economics class. :shootme: ;D
Thats a very good low budget fix you got there.What type of material did you use to do the sewing?
|
|
|
|
Post by DeadlyPeace on Jun 17, 2009 23:29:04 GMT -5
Home economics classes........ all I did was say, "Here woman sew!" ;D
The strap actually was the remains of a nylon/cotton belt. I sewed it twice; once with standard thread to hold it together and then again with a heavier thread. That's about all I know...... I guess I didn't pay very good attention in that class. ;D
|
|